Friday, December 16, 2011

Baking 101- The Difference Between Flours


Shopping for flour can get confusing when you are bombarded with so many different choices. Most people just go with all-purpose flour or whole wheat. You see the bread flour and can assume its for baking bread, but why? What makes one flour better suited for one type of baking and not another. There is a lot to know. Here is some basic info about the different types of flour out there. Hopefully this will help you make the right choice in your quest for baking perfection.


Cake flour-
It contains 5 to 7 percent protein (considered low) which produces a very tender, fine crumb. This type of flour is important if you want a light angel food cake, sponge cake, chiffon or other foam cakes. Another upside is that it contains such little protein that its virtually impossible to over mix and over develop the gluten (which stiffens the cake).


Pastry flour- 
It contains 7 to 9 percent protein. This flour is great for making pie crusts. It is just enough protein to create gluten to hold the pie crust together but won't become still from over mixing. Apparently this type of four can be difficult to buy at a regular grocery store. If you want to try it, look for it at the bulk section of a natural foods store. You can also substitute this type of flour with unbleached all-purpose flour. 


Self-rising flour-
It contains 7 to 11 percent protein. This is considered low to medium protein flour that is similar to pastry and all-purpose flour. It also contains 1 1/2 teaspoons of baking powder and 1/2 teaspoon of salt per cup of flour. You should only use this flour in recipes that specifically calls for it. 


All-purpose flour-
It contains 7 to 12 percent protein. This is probably the most common type of flour that people buy. It can be used for just about every type of baking, although it is usually not the best choice for most recipes. The old saying "jack of all trades, master of none" is true for this flour. One of the big reasons this type of flour is not good for specific baking, such as pastries, is because it is not consistent.  The reason for this is that each brand of flour has its own blend that has varying protein levels. 


You should also stay away from bleached all-purpose flour. When it is bleached it takes away flavor and protein. According to Cindy Mushet, you should stick to national brands such as Gold Medal. Be sure you get unbleached.


Bread flour-
This contains a high level of protein, between 12 to 14 percent. It is great for making bread because the high level of protein helps produce enough gluten. Gluten helps the bread expand whilst still holding its shape (For more information check out my upcoming post on how gluten works). I also use bread flour in my chocolate chip cookie recipe because it produces a hardier cookie. If you are having trouble producing flat cookies you should try using this type of of flour instead. 


Wheat flour-
This type of flour also is high in protein. I could not find the specific percentage though. Since it is higher in protein it produces a good amount of gluten and can be in bread making. You can also use this type of flour in your other baking goods but be aware that it produces a denser product. 


I recently took a bread making class and was surprised to find out that the wheat flour sold next to the other flours at the grocery store are not as good for you as you would think. In order for the flour to stay fresh at room temperature for an extended period of time, the manufacturer must remove much of the "good for you" elements found in the wheat kernel. The only difference between the wheat flour and unbleached all-purpose flour at the store are the addition of 3 B vitamins. Wheat flour is much better for you but only if it has been freshly milled. You can find this flour at health food stores in the refrigerator section. 
For more information please check out http://ourdailykneads.com/index.php?option=com_content&view=article&id=22:a-single-seed-of-wheat&catid=39:nutritional-information&Itemid=2


Storing flour-
All flour should be stored in an airtight container. It can be left at room temperature but Refrigerating or freezing can significantly extend the shelf life of all flours. White flours only have a shelf life of 9 months and whole wheat flour at the supermarket, only a couple months. It is important to keep fresh flour because it will dry out and cause your ratios to be off in your recipes. 

Wednesday, December 7, 2011

How To Make Your Berries Last Longer!


This tip is from my friend Rutie's blog at http://spiceoflifeasawife.blogspot.com/. I haven't tried it yet but I am very excited to. There is nothing I hate more than to buy expensive berries and have them become moldy by the next day. If you try this, let me know how it works for you!

It's super easy to do...

Mix 1 part vinegar (apple cider is recommended) to 10 parts water. Rinse berries with the mixture to kill bacteria and spores!

Monday, December 5, 2011

Cheesy Au Gratin Potato Recipe


I have noticed a trend in my cooking over the past several months. I have been focused on comfort foods. It may be because its the holiday season, or that I recently moved to freezing cold Colorado or maybe its because I am nearing my 8th month of pregnancy. :) Anyway, this dish is great comfort food. Who doesn't love cheesy, creamy potatoes with a hint of garlic? I served it on Thanksgiving and it was a great hit. I tried to get feedback from my husband about what to change for the next time I make it and he told me "don't change a thing".  Hope you enjoy!


Ingredients:


4 Russet potatoes, sliced to 1/4 inch slices
1 medium yellow onion, diced 
Salt & pepper to taste
3 tablespoons unsalted butter
3 tablespoons all-purpose flour
2 garlic cloves, minced
1/2 teaspoon salt
2 cups whole milk
2 cups sharp cheddar cheese, shredded


Yields a side for 5-6 people


Time: 10-30 minutes prep (depending on how you cut the potatoes) and 1 hour 45 minutes cook time.


Directions:


Preheat oven to 400 degrees F. Butter a 9x13 baking dish. Layer dish with sliced potatoes and gently mix in diced onions. 


In a medium saucepan melt butter over medium heat. Add minced garlic and saute for about 30 seconds. Mix in flour and salt, stirring with a whisk for about 1 minute. 

Stir in milk. Cook until mixture has thickened. Stir in cheese all at once and continue stirring until melted, about 30 seconds to 1 minute. 


Pour cheese mixture over potatoes and gently combine so all the potatoes are covered. Lightly top with additional cheese (optional). I used freshly grated aged Parmesan cheese.


Cover tightly with non-stick foil or foil sprayed with cooking spray and cook for about 1 1/2 hours or until potatoes are soft and the liquid is absorbed. 

If you like a crusty top, remove foil 15-20 minutes before taking out of the oven. 

Monday, November 28, 2011

Homemade Creamed Corn Recipe


Canned creamed corn was one of my favorites growing up. However, as an adult canned creamed corn grosses me out. My husband is not a fan either. This Thanksgiving I wanted to see if homemade creamed corn was much better. This creamed corn recipe was really good. I plan on making it at my future holiday dinners and maybe every once in a while through out the year (it has too much fat to have all the time). The original recipe calls for frozen corn but I opted fresh instead. I think frozen corn tends to be mushy and since its already creamed I thought it needed the crunch and sweetness of fresh.


Ingredients:


2 1/2 cups of fresh corn kernels (5 or 6 cobs) or 2 (10 ounce) packages of frozen corn
1 cup heavy whipping cream
1 teaspoon salt
2 tablespoons granulated sugar
1/4 teaspoon freshly ground black pepper
2 tablespoons unsalted butter
1 cup whole milk
2 tablespoons all-purpose flour
1/4 cup freshly grated aged Parmesan cheese, plus more for garnish


Yields 6 servings


Time: 20 minutes prep and 15 minutes cook time.


Directions:

Shuck and clean the corn. Blanch- In a medium to large pot fill 3/4 of the way with water. Bring to a rapid boil. Add a couple pinches of salt and add the corn. 


Return to boil and let boil for 5 minutes. 
Drain corn and shock (place in an ice water bath).


Drain the water. Holding the corn vertically and using a sharp knife, cut the kernels off the cob. Using the backside of the knife, scrape the corn to remove the pulp from the cob. 


In a large skillet or saucepan add the corn, butter, cream, salt, pepper and sugar.  Mix well and heat over medium until butter is melted. In a small bowl whisk together milk and flour. Add to the corn mixture. 


Let simmer until sauce is thickened and corn is soften to desired texture. Remove from heat and stir in Parmesan cheese.  Garnish with freshly grated Parmesan cheese and serve immediately. 


I have made this recipe twice. The first time I thought it would be really good to add a lot of Parmesan cheese to the top and bake in the oven to melt. I did not like this version at all. It was way too cheesy and overwhelmed the dish. The second time I just garnished the corn with a little bit of the Parmesan cheese. Both my husband and I thought this was the best tasting way. 

Saturday, November 26, 2011

Homemade Cranberry Sauce (with Pineapple)


You can whip this quick and easy sauce up in a matter of minutes. It tastes great and is better for you because it's made of fresh fruit. You can skip adding the crushed pineapple at the end and serve the traditional sauce. However, you should give the pineapple a try if you have never had it. It adds texture and the sweetness of the pineapple cuts the sourness of the cranberry. It becomes more palatable for kids and people that are not normally fans of the traditional sauce. 


Ingredients:


1 (12 ounces) package of fresh cranberries, rinsed well
1 cup granulated sugar
1 cup water
* Optional- 1 can (20 ounces) crushed pineapple, drained well


Yields 2 cups (with no pineapple) and 3 cups (with pineapple)


Time: 5 minutes prep and 10 minutes cook time.


Directions:


In a medium saucepan add water and sugar. Bring to a boil until sugar is completely dissolved. 


Add cranberries and return to boil. 


Let boil for 10 minutes.


Place in an airtight container and let cool on counter to room temperature. 
Or add the crushed pineapple (drained) and stir in well. 

Serve or store in the refrigerator. You can also freeze any extra and serve at your next holiday!


Wednesday, November 23, 2011

Almond Stuffed Bacon Wrapped Dates


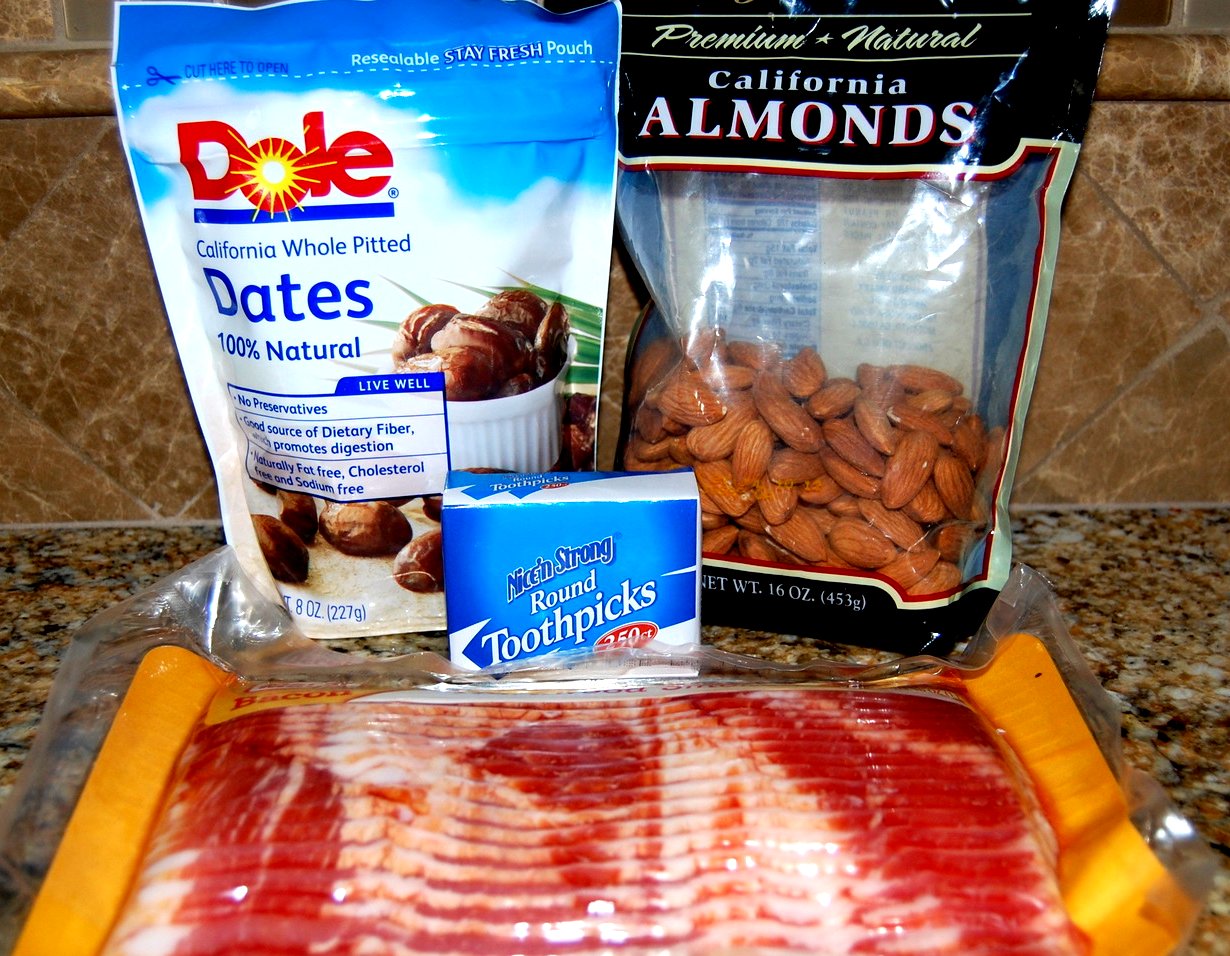
If you haven't yet tried a bacon wrapped date, I highly recommend that you do. I am not the biggest fan of dates but they pair very well with the crispy bacon. They are easy to make and are not very well known yet so it can be a nice change of pace. The flavor combination reminds me of having pancakes and bacon with maple syrup. When selecting your bacon avoid really thick cuts and maple flavored bacon (its already sweet enough). When selecting the dates try to use small and medium sized ones. The large dates throw off the balance  by making it too sweet. When you bite into them, the bacon should be crisp and salty and the date should be moist. The almond in the center gives it an extra crunch, which is very much needed. You can also stuff the dates with blue cheese, goat cheese, and other types of nuts. The recipe below is my favorite combo. 


Ingredients:


1 package of smoked bacon
1 package (30-35 count) dates, pitted
whole almonds, unsalted (30-35)
Toothpicks


Yields small appetizer for about 6-8 people


Time: 20 minutes prep and 30 minutes cook time.


Directions:

Preheat oven to 375 degrees F. Stuff the dates with one almond each. This should be easy since there is a hole where the dates have been pitted. 

Place stuffed date on strip of bacon and wrap until covered. Cut with scissors or knife 
  • Try to minimize overlap because it will cause that section to be less cooked then the rest of the bacon. 
  • Expect to have left over pieces of bacon.  
  • Keep bacon in refrigerator until you need to use it. Warm bacon is hard to cut and handle. 


Using a toothpick pierce the date to keep bacon securely attached.
Make sure to avoid the almond when inserting toothpick.


On a foil lined baking pan, bake in preheated oven for about 15-2o minutes or until bacon looks crispy and dark. 
You don't want the bacon to be under cooked because this appetizer really needs that extra crunch.

 Check to see how well the underside of the dates are cooked. 
If desired, turn and cook for an additional 10 minutes or so. Make sure to keep an eye on them because they can burn quickly. 

Place dates on paper towel lined plate and let cool for about 10 minutes before serving. 

This last batch that I made ended up not being very salty at all. This is a huge problem because the salt is needed to balance the sweet of the date. I think the problem was the brand of bacon that I used. My husband had the great idea of making a salt water solution and lightly spraying the dates with it. The water evaporated and left the dates with the right amount of salt. It worked like a charm and saved the day! 

Tuesday, November 22, 2011

Super Simple Turkey Brine

I am not a turkey roasting expert but have made several in my life. The biggest thing that I have learned to make a moist, delicious turkey is to use a brine. You can use the brine as the main seasoning, or use a simple one and flavor your turkey in another way. This year we decided to make a maple and bacon flavored turkey so we used a simple brine, we didn't want too many conflicting flavors. If you want to make a fancy brine there are many good recipes online.


Ingredients:


1 (12-15 pound) turkey, defrosted or fresh
1 gallon of water
1 cup of sea salt
1 cup of sugar
Ice
Several tablespoons dried sage


* You can also add lots of your favorite fresh or dried herbs to  spice up this simple recipe.


Yields brine enough for one turkey.


Time: 1-2 hour prep and 12-15 hours soaking time (1 hour for every pound of turkey)


Directions:


Make sure your turkey is fully defrosted. This can take a couple days in the refrigerator so plan accordingly. 

In a large pot bring water to a boil. Add sugar and salt and let dissolve. Remove from heat. Let brine cool to room temperature. Add herbs. 

Remove neck and gizzards from the inside of your turkey. Rinse well and pat dry. 

In a large, sturdy container (I used a garbage bag) place turkey. Pour in brine mixture and add several cups of ice. Make sure all parts of the turkey are covered with mixture. Cover (or in my case, tie bag) and place in refrigerator.
 Refrigerate 1 hour for every pound of turkey. 
Do not let brine longer as it will produce a very salty bird. 

When the turkey is brined for the directed amount of time rinse very well and pat dry.

Prepare and cook turkey as desired. Be careful with cooking times because a brined bird is supposed to cook more quickly than a non-brined bird.

Enjoy!!!