Showing posts with label Comfort Food. Show all posts

Thursday, December 29, 2011

The Perfect Chocolate Chip Cookie Recipe


When I was pregnant with my son I loved eating chocolate chip cookies. My favorite were the Pillsbury ones you get in the refrigerator section at the store. I was sooo sad to find out that they contain trans fats. I tried the natural alternatives but they just didn't taste the same. Thus I began my mission. I must have tried a dozen different combinations to figure out they best chocolate chip cookie recipe to suite my tastes. The one listed below is what I came up with. I figured out that not only are the quality of ingredients and proportions important but a couple other tricks really help make the perfect cookie. You will have to read the rest of the post to find out what those tricks are. :) I have had almost everyone who has tried these cookies ask for the recipe. I have also had someone ask me to bake them for a party they were throwing and another person ask me to bake them for their daughter's bake sale. Give them a try and let me know how they turn out for you.


Ingredients:


2 & 1/4 cups bread flour or unbleached all-purpose flour
1 cup salted butter (good quality), melted
1 teaspoon baking soda
3/4 cup granulated sugar (or baker's sugar)
3/4 cup light brown sugar, packed
1 large egg, 1 egg yolk
2 tablespoons milk
2 teaspoons vanilla extract
12 ounces semisweet chocolate chips (good quality, like Ghirardelli)

*This recipe makes  soft and chewy cookie (pictured above), if you want more of a crunchy Chips Ahoy type cookie (pictured at the bottom of post), half the butter, reduce the flour to 2 cups and add 1/2 teaspoon of salt to the dry ingredients!


Yields 2 dozen cookies


Time: 1 hour & 10 minute prep (an hour in chilling in the fridge) and 30 minute cook time


Directions:


Melt butter, set aside. In a medium bowl mix flour, salt and baking soda.


In a large bowl mix butter and sugar with an electric mixer until creamy and even in consistency.


Slowly add eggs, vanilla and milk to the creamed mixture. Mix with mixer for about 30 seconds. Add dry ingredients to the wet ingredients. Mix well. Fold in chocolate chips.


Cover tightly with plastic wrap and refrigerate for at least 1 hour, up to overnight.

Preheat oven to 375 degrees F. Line cookie sheet with parchment paper and place a generous dollop of cookie dough about 1 1/2 inches apart.


Bake for 6 minutes, then turn baking sheet to ensure even baking. Bake for an additional 5-7 minutes. Keep an eye on the cookies because they can burn easily. You want the sides to be be golden brown and the tops to not appear "wet".

Place cookies with parchment paper on a wire cooling rack. These cookies are best served fresh and slightly warm. 


Tricks I have learned....
  • Only use top quality butter (never use margarine) and chocolate chips.
  • Make sure the cookie dough is cold when you put it on the pan. It keeps the cookies from becoming flat.
  • Always use a silicon baking mat or parchment paper to keep cookies from sticking to baking sheet. 
  • Always turn cookie sheet halfway through cooking to make sure they cook evenly.
  • Use a small ice cream scoop to place dough on cookie sheet so they will be the same size and shape (I didn't do this to the cookies pictured above).
  • If using a baking stone- Place stone in oven while it is preheating. Place cookie dough on parchment paper on the counter and then place that directly on the hot stone. 
If using a stand mixer- Place butter and sugar in mixing bowl. Using the paddle attachment mix on medium speed, about 2 minutes.While still mixing add vanilla, eggs and milk. When well incorporated mix in salt, baking soda and flour. Mix until blended then turn the speed down to stir. Add chocolate chips and mix for an additional 15 seconds. 

Wednesday, December 21, 2011

Homemade Mac N' Cheese


Who doesn't love a good macaroni and cheese? It's personally one of my favorite things to eat. I recently went to visit my grandmother and she requested I make this. It's super easy and pretty quick. You have to try it! If you do, make sure to use sharp cheddar and not mild. 

Ingredients:

1 1/2 cups (12 ounces) small elbow noodles, uncooked
4 tablespoons butter, unsalted
4 tablespoons all-purpose flour
1/2 teaspoon salt
1/4 teaspoon black pepper
1 cup heavy cream
1 cup milk
2 cups sharp cheddar cheese, shredded (plus more to top the breadcrumbs)
1/2 cup bread crumbs, unseasoned

Yields 4 servings (I usually double it when cooking  for more than my husband and son)

Time: 15 minutes prep (includes cooking the noodles) and 35 minutes cook time.
*If you are a good multi-tasker you can save time by cooking the noodles while you make the cheese sauce. 

Directions:

Preheat your oven to 400 degrees F. Cook noodles as directed on box. Drain and rinse with cold water. Noodles should be slightly more al dente then you usually like. They will continue to soften when you bake them in the oven later.

In a medium saucepan melt butter over medium high heat. Add flour, salt and pepper, whisking constantly. This makes a roux.


Lower heat to medium. Add cream and milk. Whisk constantly as the mixture thickens to desired consistency, 5-10 minutes. 
Don't step away during this part, it can burn quickly. 


Add cheese into mixture. Stir well and allow cheese to fully melt, about 3-5 minutes. 


Add noodles to cheese mixture in saucepan.  Make sure cheese sauce is evenly coating all noodles. Pour into a baking pan. Top with breadcrumbs and then with a thin layer of cheese.

I topped half with sliced fresh tomatoes, per my grandmother's request. 
Bake for 20 minutes or until bubbling and breadcrumbs are golden. 

I cheated and finished browning the breadcrumbs via the broiler.
Freezing and storing: This dish is great to make ahead of time and freeze. Follow all steps up to the part where you top with breadcrumbs and cheese. Simply pour the cheese/noodle mixture in an airtight container and freeze. It's good for up to 1 month in the freezer. The night before you want to make it, place the frozen mixture in the fridge. When it is defrosted top with breadcrumbs, cheese and bake normally. 

Monday, December 5, 2011

Cheesy Au Gratin Potato Recipe


I have noticed a trend in my cooking over the past several months. I have been focused on comfort foods. It may be because its the holiday season, or that I recently moved to freezing cold Colorado or maybe its because I am nearing my 8th month of pregnancy. :) Anyway, this dish is great comfort food. Who doesn't love cheesy, creamy potatoes with a hint of garlic? I served it on Thanksgiving and it was a great hit. I tried to get feedback from my husband about what to change for the next time I make it and he told me "don't change a thing".  Hope you enjoy!


Ingredients:


4 Russet potatoes, sliced to 1/4 inch slices
1 medium yellow onion, diced 
Salt & pepper to taste
3 tablespoons unsalted butter
3 tablespoons all-purpose flour
2 garlic cloves, minced
1/2 teaspoon salt
2 cups whole milk
2 cups sharp cheddar cheese, shredded


Yields a side for 5-6 people


Time: 10-30 minutes prep (depending on how you cut the potatoes) and 1 hour 45 minutes cook time.


Directions:


Preheat oven to 400 degrees F. Butter a 9x13 baking dish. Layer dish with sliced potatoes and gently mix in diced onions. 


In a medium saucepan melt butter over medium heat. Add minced garlic and saute for about 30 seconds. Mix in flour and salt, stirring with a whisk for about 1 minute. 

Stir in milk. Cook until mixture has thickened. Stir in cheese all at once and continue stirring until melted, about 30 seconds to 1 minute. 


Pour cheese mixture over potatoes and gently combine so all the potatoes are covered. Lightly top with additional cheese (optional). I used freshly grated aged Parmesan cheese.


Cover tightly with non-stick foil or foil sprayed with cooking spray and cook for about 1 1/2 hours or until potatoes are soft and the liquid is absorbed. 

If you like a crusty top, remove foil 15-20 minutes before taking out of the oven. 

Monday, November 28, 2011

Homemade Creamed Corn Recipe


Canned creamed corn was one of my favorites growing up. However, as an adult canned creamed corn grosses me out. My husband is not a fan either. This Thanksgiving I wanted to see if homemade creamed corn was much better. This creamed corn recipe was really good. I plan on making it at my future holiday dinners and maybe every once in a while through out the year (it has too much fat to have all the time). The original recipe calls for frozen corn but I opted fresh instead. I think frozen corn tends to be mushy and since its already creamed I thought it needed the crunch and sweetness of fresh.


Ingredients:


2 1/2 cups of fresh corn kernels (5 or 6 cobs) or 2 (10 ounce) packages of frozen corn
1 cup heavy whipping cream
1 teaspoon salt
2 tablespoons granulated sugar
1/4 teaspoon freshly ground black pepper
2 tablespoons unsalted butter
1 cup whole milk
2 tablespoons all-purpose flour
1/4 cup freshly grated aged Parmesan cheese, plus more for garnish


Yields 6 servings


Time: 20 minutes prep and 15 minutes cook time.


Directions:

Shuck and clean the corn. Blanch- In a medium to large pot fill 3/4 of the way with water. Bring to a rapid boil. Add a couple pinches of salt and add the corn. 


Return to boil and let boil for 5 minutes. 
Drain corn and shock (place in an ice water bath).


Drain the water. Holding the corn vertically and using a sharp knife, cut the kernels off the cob. Using the backside of the knife, scrape the corn to remove the pulp from the cob. 


In a large skillet or saucepan add the corn, butter, cream, salt, pepper and sugar.  Mix well and heat over medium until butter is melted. In a small bowl whisk together milk and flour. Add to the corn mixture. 


Let simmer until sauce is thickened and corn is soften to desired texture. Remove from heat and stir in Parmesan cheese.  Garnish with freshly grated Parmesan cheese and serve immediately. 


I have made this recipe twice. The first time I thought it would be really good to add a lot of Parmesan cheese to the top and bake in the oven to melt. I did not like this version at all. It was way too cheesy and overwhelmed the dish. The second time I just garnished the corn with a little bit of the Parmesan cheese. Both my husband and I thought this was the best tasting way. 

Tuesday, November 8, 2011

Homemade Ranch Dressing Recipe


My son loves to eat ranch dressing with his veggies. In fact, that is the only way I can get him to eat any at all. A couple days ago we ran out of our Hidden Valley ranch. Since I am trying to feed my family as much homemade food from scratch as possible, I decided to try making it myself. I was surprised how simple to was to make. If you have a large variety of spices in your cupboard, you can probably make it without going to the store. It's not going to last as long as the store bought stuff because its lacking all the preservatives, but that's a good thing. And if you were wondering... my son loved it. He kept saying "mmm", every time he bit into a ranch covered carrot stick! If you know of any other outstanding ranch recipes, please share them with me!!

The recipe I used is thick for veggie dipping but you could also substitute buttermilk to make it thinner for salads. Just use 1/2 cup buttermilk, 1/2 cup sour cream, and 1/2 mayo instead of what is listed below.

Ingredients:

1 cup reduced-fat olive oil mayonnaise (any mayo will do)
1/2 cup reduced-fat all natural sour cream (any sour cream will do too)
1/2 teaspoon dried chives
1/2 teaspoon dried parsley
1/2 teaspoon dried dill weed
1/4 teaspoon garlic powder
1/4 teaspoon onion powder
1/8 teaspoon salt
1/8 teaspoon freshly ground black pepper
Yields 1 1/2 cup of ranch

Time: 35 minutes prep time

Directions:

Whisk all ingredients in a small bowl. Cover and refrigerate for at least 30 minutes.


Cover and refrigerate leftovers for up to two weeks.

Thursday, November 3, 2011

Baked Ham & Cheese Sandwiches (Ham Babies)


I first tried these delicious little sandwiches at my friend Ashley's house. She is the biggest foodie I know and a great cook. I was surprised how addictive they were. If you are looking for an different appetizer that will impress your friends and be a huge crowd pleaser, give this one a try. What makes it so good are sweetness of the Hawiian rolls, the saltiness of the ham and the creaminess of the butter and cheese. I bet that they will quickly become one of your "go to" recipes. There are many different recipes out there for these sandwiches. I have tried a couple but this recipe is the best by far. 


Ingredients:


12 King's Hawaiian rolls
12 thin slices of ham (I like to get it fresh from the deli, I recommend Black Forest)
12 thin slices of cheddar cheese (sharp Cheddar is really yummy)


For poppy seed sauce:


3/4 stick of unsalted butter, melted
1/2 tablespoon Worcestershire sauce
2 tablespoons brown sugar
1/2 tablespoon yellow mustard 
1/2 tablespoon poppy seeds


Yields 12 sandwiches


Time: 15 minutes prep and 25 minutes cook time.


Directions:

Melt butter in small saucepan (or microwave in small bowl, about 45 seconds), mix in all other ingredients.


 Brush the bottom of a 9x13 baking pan with some of the butter mixture.


Cut the entire package of rolls horizontally and lightly brush the bottom of each roll with some of the butter mixture. 


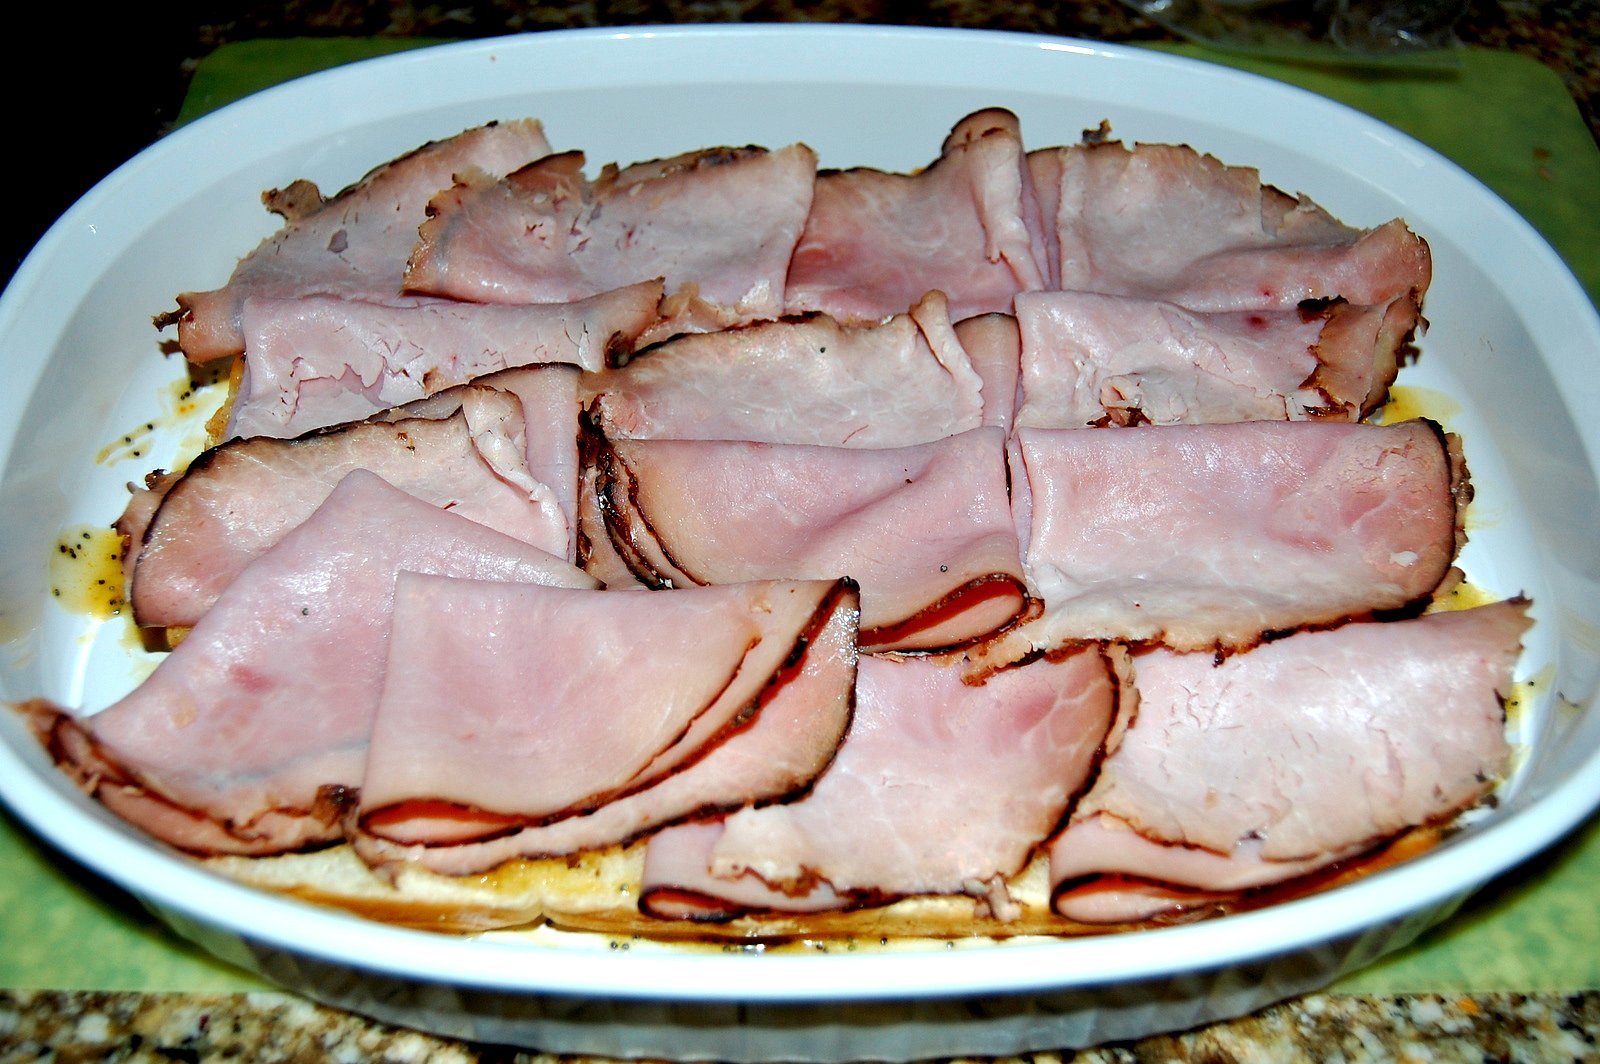
Place thin layer of ham...


and cheese on the bottom half of each roll. 


(These slices are a little thick)
Top with the top half of roll. Brush tops of sandwiches with the remaining butter mixture. Let some of the mixture drip over the sides.


Preheat oven to 350 degrees F. Cover tightly with foil and bake for about 25 minutes. 


Saturday, October 29, 2011

Homemade Pizza Dough Recipe


Ingredients:

2 1/4 teaspoons active dry yeast
1/2 teaspoon brown sugar
1 1/2 cups warm water
1 teaspoon salt
2 tablespoons olive oil
3 1/3 cups all purpose flour

Yields 1 large pizza

Time: 1 hour and 45 minutes prep (mostly letting dough rise) and 25 minutes (5 minutes for pre baking) cook time

Directions:

In a large bowl combine yeast, water and brown sugar. Whisk well and let sit for 10 minutes.

Whisk in salt and oil to yeast solution. Mix in flour.

Turn dough out onto a clean, lightly floured surface. Knead dough for 5-10 minutes, adding flour as needed until no longer sticking to hands. 

Place dough in well oiled bowl. Make sure the top of the dough is lightly covered with oil. Cover with damp lint free cloth or plastic wrap. 

Let dough rest for 60 minutes or until it has doubled  in size. 

Preheat oven to 425 degrees F.

Punch down dough and knead into a tight ball. Let rest for several minutes.

Roll out on lightly floured surface. 

Place on lightly oil pizza pan or cookie sheet and let rise for 15-20 minutes.

Poke several holes in crust with fork and pre bake for 5 minutes. 

Top with favorite toppings and bake for 15-20 minutes or until crust and cheese are golden brown. Make sure to check that the bottom of the pizza is also golden brown. If it isn't, remove from cooking sheet and place directly on oven rack. 

Try stuffing the crust with cheese and garlic and/or make a mixture of butter, dried parsley, salt, and garlic powder and smoother on pizza crust for extra deliciousness.

Zesty Pizza Sauce Recipe

When I first mixed this sauce I thought that the flavors were very overpowering. The taste of raw garlic numbed my mouth. However, after baking it on the pizza it came out great. It had a very nice flavor and added a lot of depth to the combination of the crust and toppings. I recommend giving this a try. If anyone has another great recipe for pizza sauce please leave a comment and share it with me. I am always on the look out for the perfect recipe. :)


Ingredients:


1 (6 ounce) can of tomato paste
6 ounces of warm water
3 tablespoons of freshly grated Parmesan cheese
1 teaspoon minced garlic
2 tablespoons honey
3/4 teaspoon onion powder
1/4 teaspoon dried oregano
1/4 teaspoon dried marjoram
1/4 teaspoon dried basil
1/4 teaspoon ground black pepper
1/8 teaspoon cayenne pepper
1/8 teaspoon dried red pepper flakes
Salt to taste


Yields: Sauce for 1 large pizza


Directions:


Mix all ingredients in bowl. Let sit for at least 30 minutes to let flavors mix together. Serve.


Friday, October 21, 2011

Parmesan and Romano Crusted Chicken Breast with Crispy Prosciutto and Garlic


I made this for some dinner guests a couple weeks ago and got rave reviews. I made it again last night for my husband and I. This meal is too good not to share the recipe. The chicken is crispy, cheesy and moist. The crunchy prosciutto and sauteed garlic slices are sweet and salty. If you serve it with fresh pasta and homemade Alfredo sauce, like I did, the creaminess caps it off as a perfect meal. This is one of my favorites right now. Yummy!


Ingredients:


7-8 chicken tenderloins or 3-4 chicken breasts 
(if using chicken breasts make sure to butterfly then slice in half. Then place in between two pieces of wax paper and bang with something heavy until slices are flat)
1/2 cup high fat content milk 
(I used homemade buttermilk I made the other day)
3 to 6 ounces of thin sliced prosciutto
8 garlic cloves, thinly sliced
1 egg
1 cup of plain Panko bread crumbs
1/4 cup of freshly grated Parmesan cheese, plus more for garnish
1/4 cup of freshly grated Romano cheese
1 tablespoon of Italian seasoning
Salt and freshly ground pepper
2 tablespoons of butter
2 tablespoons of olive oil


Serve with fresh pasta and homemade Alfredo sauce (recipe available on this blog)


Yields 3-4 servings


Time: 20 minute prep and 20 minute cook time.


Recipe:

Clean and pat dry chicken.
 Place chicken and milk in medium size bowl and let soak for at least 30 minutes to 1 hour on kitchen counter. 


While waiting for chicken, add 1 tablespoon of olive oil to large skillet over medium heat. Add slices of prosciutto. Cook for 3-4 minutes. Add slices of garlic and cook for an additional 5 minutes or until prosciutto is crispy and garlic is golden brown.  
(Some pieces will finish before others, take them out as they become crispy and brown. This way all pieces will be perfectly cooked).
Rest on paper towel to drain excess oil.


Prepare chicken coating by adding cheeses, bread crumbs and Italian seasoning in a medium size bowl or plate.


Remove chicken from milk (remove excess). Season chicken with salt and pepper. Mix egg in small bowl. Dip chicken in the egg (remove excess), then  dip in breadcrumb mixture. Press breadcrumbs into chicken and make sure they are very well coated. 


In the same skillet you cooked the prosciutto, add 1 tablespoon of butter and olive oil. Heat over medium high heat until skillet is hot. Add chicken and cook for 3 minutes or until a dark golden brown. Flip and cook for an additional 2-3 minutes or until dark golden as well. When adding more chicken pieces you may need to add more butter and oil.

Let rest on paper towel for 3 to 5 minutes before serving. 

Serve with some homemade Alfredo sauce, a small handful of prosciutto and garlic and top with freshly grated Parmesan cheese. 


The chicken reheats best in an oven or toaster oven at 350 degrees f until hot and crispy again. 

Homemade Alfredo Sauce Recipe


My all time favorite pasta sauce is Alfredo. Sometimes when I go to Olive Garden all I want is the Alfredo sauce and bread sticks. This is a great recipe. It is flavorful and light. I usually make a large batch and freeze some for later. It turns out just as fresh and tasty when it is reheated.


Ingredients:


6 tablespoons of butter
2 cups of heavy whipping cream
2 garlic cloves, minced
pinch of nutmeg
salt to taste
1/2 cup of freshly grated Parmesan cheese, plus more for garnish
1/2 cup of freshly grated Romano cheese
2 egg yolks


Yields 4 servings


Time: 5 minute prep and 10 minute cook time.


Recipe:


Melt butter in a medium saucepan over medium heat. Add minced garlic and saute for 30 seconds to 1 minute.

 Add cream, stirring constantly with whisk. Stir in nutmeg, salt and cheeses. Whisk constantly until melted.

 Temper yolks by adding a 1/2 cup of sauce to a small bowl then add eggs and mix. Return egg mixture to the rest of the sauce.

 Simmer over medium heat for 3 to 5 minutes. Garnish with Parmesan cheese. 


To store, wait for the sauce to cool completely and store in airtight container. Can be refrigerated or frozen very well. To reheat from fridge simply place in saucepan and whisk constantly over medium low heat. To reheat from frozen let defrost on counter then follow the directions above. If the sauce starts to separate just whisk vigorously until it comes back together. 


Wednesday, October 19, 2011

Best Tasting Homemade Lasagna Recipe Ever


This is an updated pic from 11/1/11- after making the changes listed below.
Update: 11/2/11- I made this again and technically it was exactly how I wanted it to be. The cheese-to-sauce-to-pasta ratio was great. It had great body and was very soft and moist. However, the taste was different. This time I used pre-shredded cheeses and generic tomato products. I have to tell you that these changes completely altered the taste of the lasagna. It was still good and my husband loved it, but just tasted like ordinary lasagna to me. If you are going to go through all the trouble of making this, you should really stick to quality ingredients. It makes the all the difference in the world.


This is by far the best tasting homemade lasagna I have ever had. Okay, I may be a little biased here since I made it, but I don't think so. Normally I don't like lasagna, so I  would never make one but my husband requested that I do. Like usual, I scoured the internet for recipes and advice on techniques on how to make it great. I settled on this recipe because I liked all the ingredients and because it had so many rave reviews. I got it off of allrecipes.com from John Chandler.


Right off the bat I changed a couple things. I added a little more cheese and switched from regular sweet Italian sausage to a sweet turkey Italian sausage. I used crushed tomatoes with basil instead of regular (because that's all they had all the store) and I also added a pinch of nutmeg to the cheese mixture. Besides that I kept everything the same. When making a recipe for the first time I really try not to mess with the ingredients too much because if it tastes "off" for some reason I won't really know why.


I highly recommend this lasagna recipe and don't even feel compelled to try another. Next time I make it I will make a few more adjustments. I am going to list the recipe exactly how I made it this time but before I do, I will list the suggestions I have to make it even better.

  • Make sure the ground meat is broken up well so there aren't any large chunks.
  • Start by adding only a little salt at a time, tasting each time  you do. It can get very salty, very fast.
  • Increase the amount of cheese by at least 1/2 cup on all cheeses. 
  • Shred the mozzarella instead of slicing it to make a more even layer. 
  • Add at least 2 cups of sauce mixture on each layer. 
  • Try to have at least 3 sauce layers.
  • Make sure the last layer of noodles is covered with sauce.
  • Top with a generous portion of cheeses.
Ingredients:

1 pound sweet turkey Italian sausage
3/4 pound lean ground beef
1/2 cup minced onion
2 garlic cloves, minced
1 (28 ounce) can of crushed tomatoes with basil
2 (6 ounce) cans of tomato paste
2 (6.5 ounce) cans of tomato sauce
1/2 cup of water
2 tablespoons of granulated sugar
1 1/2 teaspoons of dried basil leaves
1/2 teaspoon of fennel seeds
1 teaspoon of Italian Seasoning
1 tablespoon salt
1/4 teaspoon for fresh ground black pepper
4 tablespoons of fresh chopped parsley
12 lasagna noodles
16 ounces of ricotta cheese
1 egg 
a pinch of nutmeg
1/2 teaspoon salt
1 pound of mozzarella cheese, sliced
1 cup of freshly grated aged Parmesan cheese 

Recipe:

In a large pot or Dutch Oven cook sausage, ground beef, onion and garlic over medium heat until well browned. Stir in crushed tomatoes, tomato paste, tomato sauce and water. Season with sugar, basil, fennel seeds, Italian seasoning 1 tablespoon of salt, pepper and 2 tablespoons of parsley. Cover and simmer for about 1 1/2 hours, stirring occasionally.  

Bring a large pot of lightly salted water to a boil. Cook lasagna noodles in boiling water for 8 to 10 minutes. Drain noodles and rinse with cold water.

In a mixing bowl combine ricotta cheese, egg, nutmeg, parsley and 1/2 teaspoons of salt.

Preheat oven to 375 degrees f. 

To make layers spread 1 1/2 cups of meat sauce in the bottom of a 9 x 13 baking dish. 


Arrange noodles lengthwise over meat sauce
 (I put one on the end too). 


Spread 1/2 of the ricotta cheese mixture on top of noodles. 


Top with a third of mozzarella cheese slices. 


Spread 1 1/2 cups of meat sauce over mozzarella then 1/3 cup of Parmesan cheese.

Repeat layers, making sure to top with remaining mozzarella and Parmesan cheese. 

Cover with non-stick foil or spray foil with non-stick cooking spray to prevent cheese from sticking to it. 

Bake in preheated oven for 25 minutes, remove foil and bake for an additional 25 minutes. Let cool 15 minutes before serving. 


It tastes even better reheated the next day!!